Arduino for Beginners
From zero to blinking LEDs with Arduino
Aims for class
- A brief intro to Arduino, was it does and how it relates to other technologies that ‘do stuff’
- Get everyone from zero to getting your Arduino hooked up and talking to your computer, and a program running
- A bit of hacking of code that other people have written
- If we have time, we’ll look at how we might build some of the prototypes you want to make
What is a microcontroller?
- Microcontroller vs Microprocessor
- Simpler computer
- Has lots of ‘peripherals’ inside - see block diagram
- Microprocessor is what’s inside your computer - needs lots of external parts to make it work: RAM, GPU, disk, etc.
What’s inside a microcontroller?
ATtiny Block Diagram:
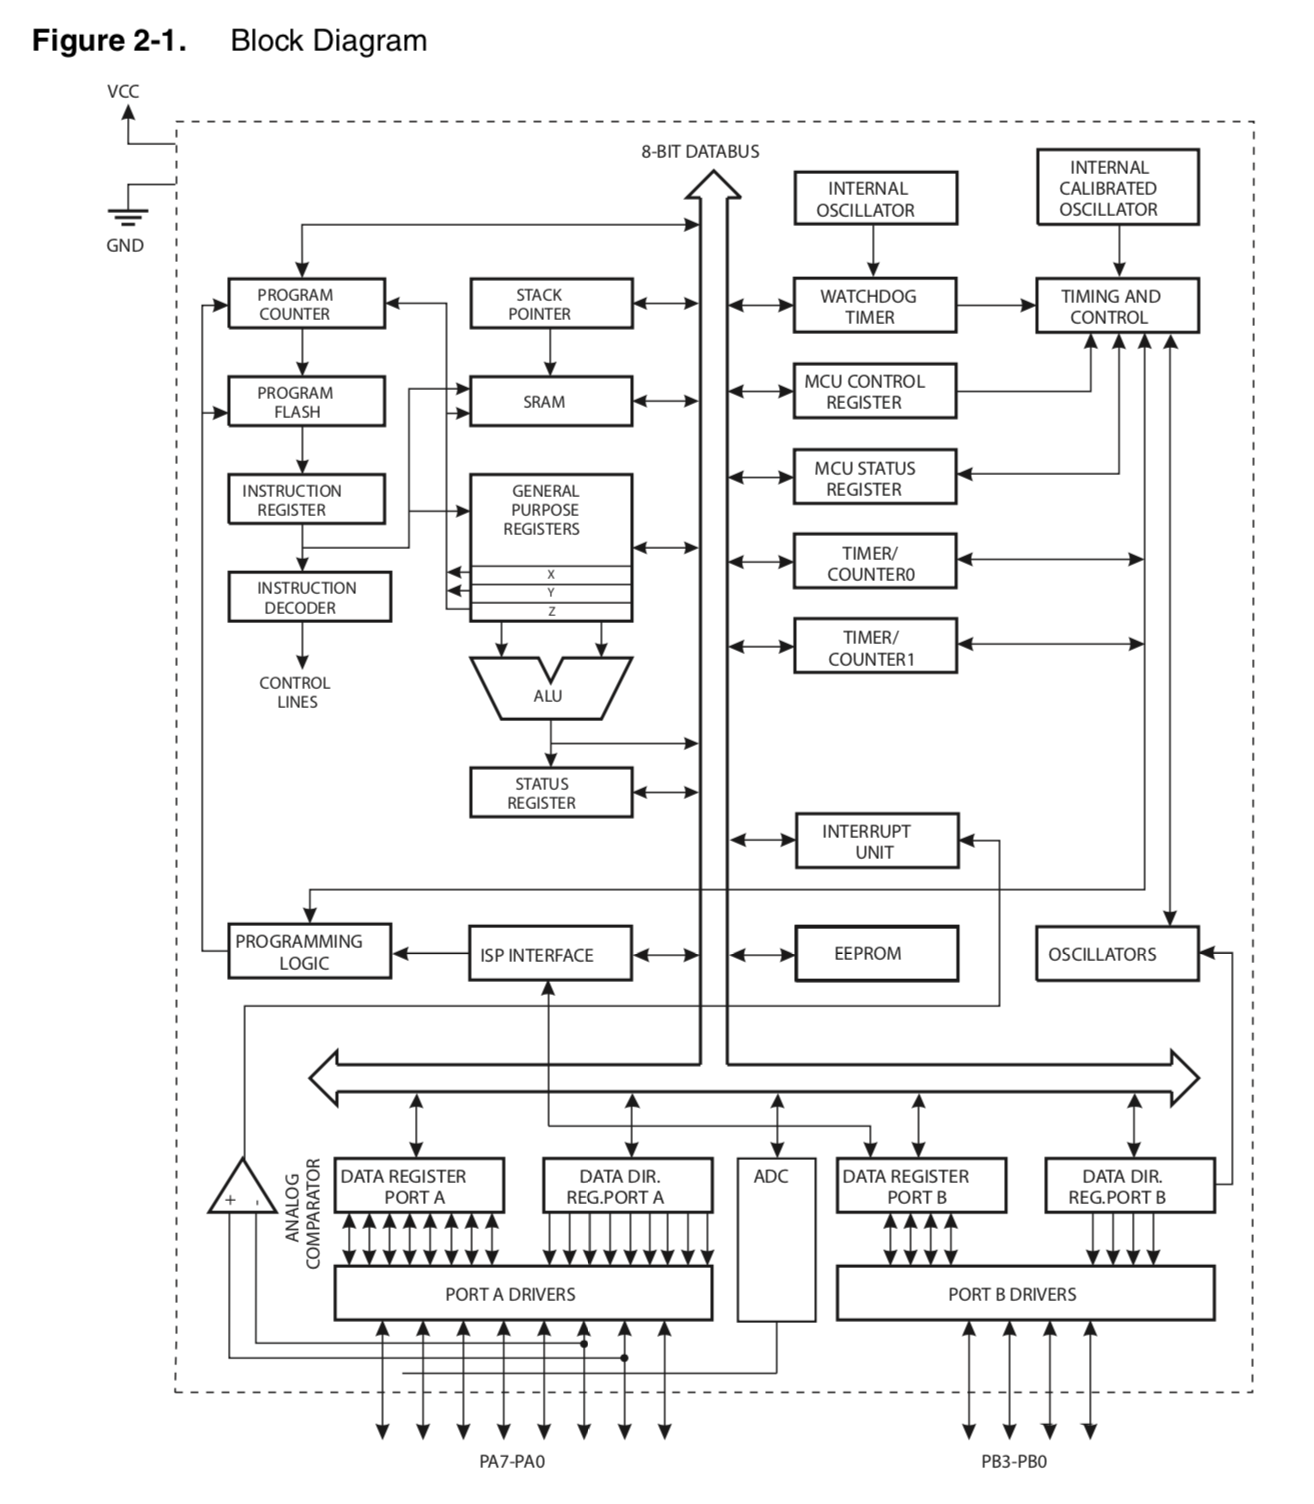
Capabilities:
- Tell time / keep time
- Remember data
- Read analogue signals from the outside world
- Talk to other microcontrollers
- Send and control power out to other devices
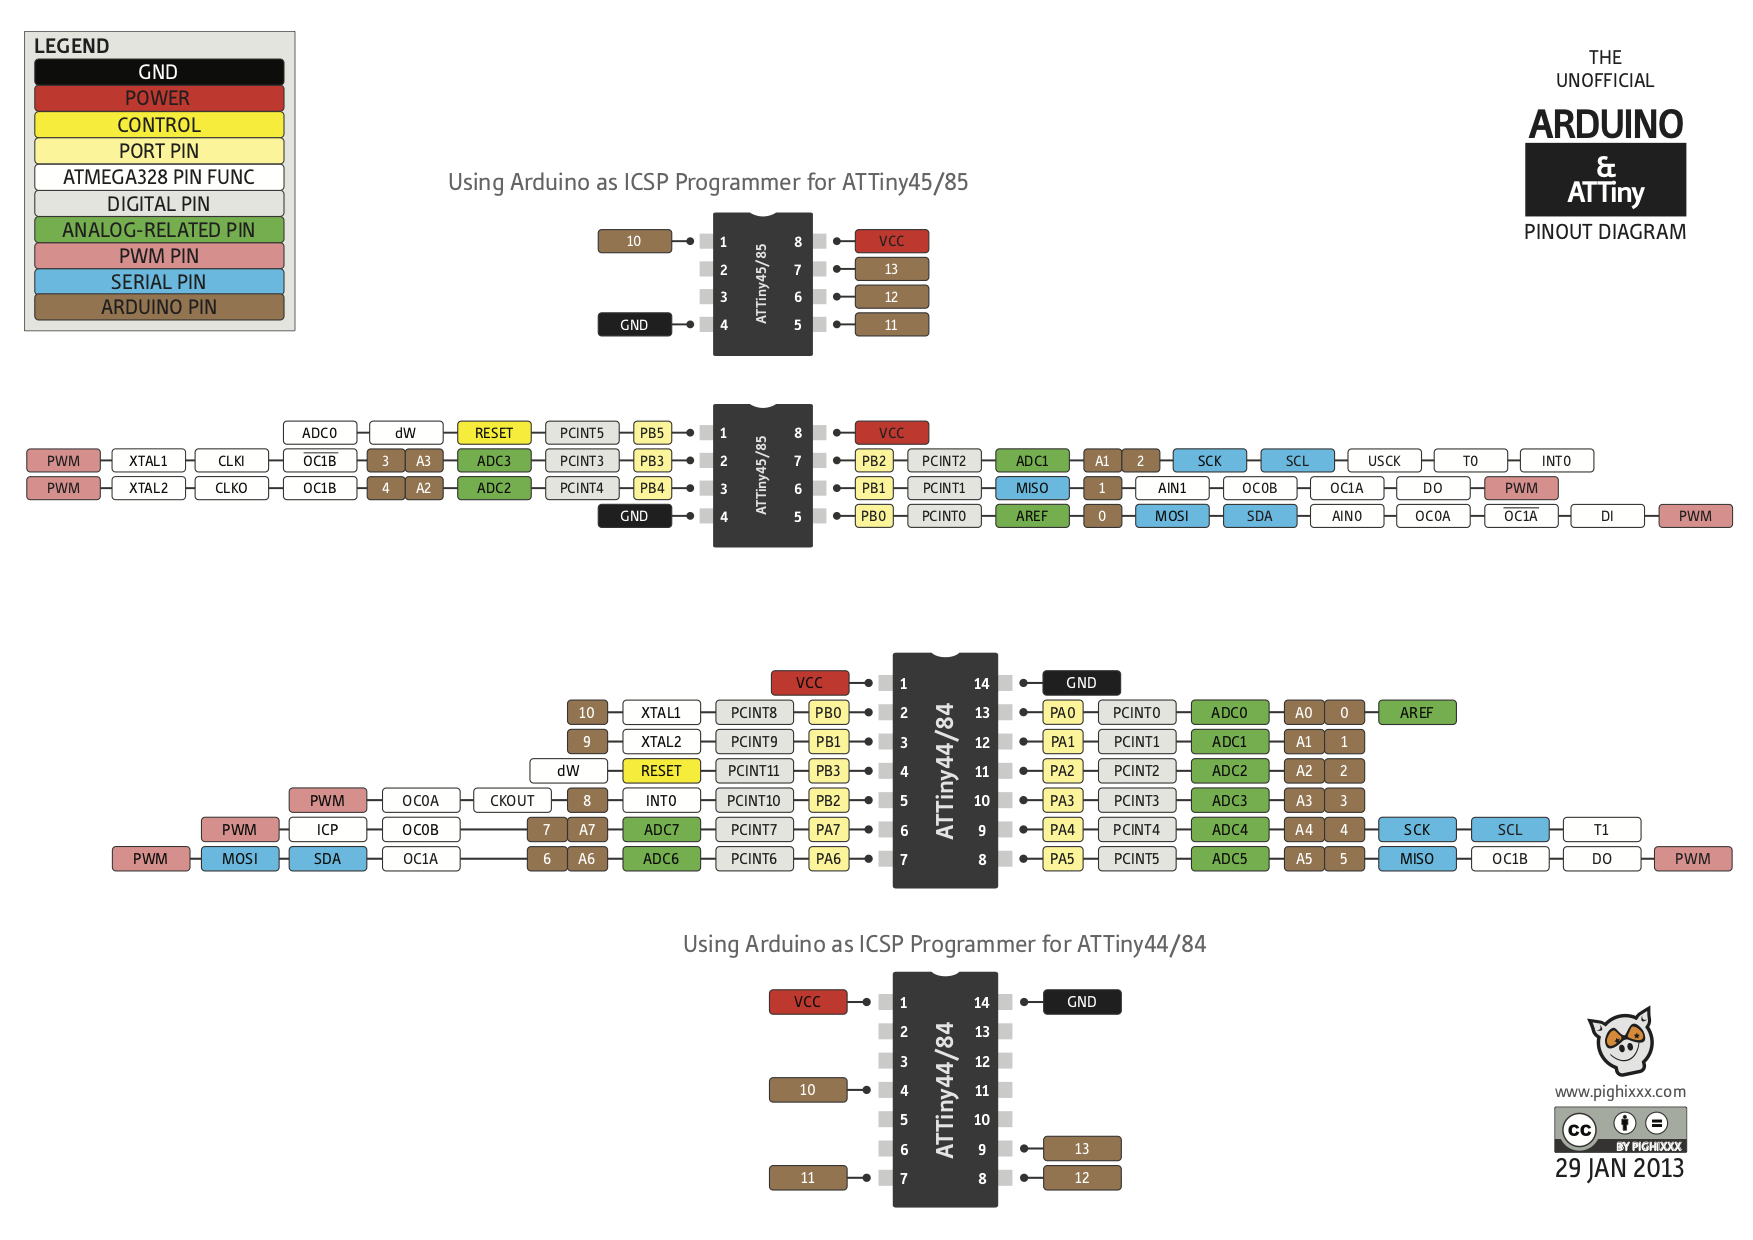
How can we access these capabilities?
Through the pins.
Pinout diagrams are your friend.
Pinout for ATtiny (as above)
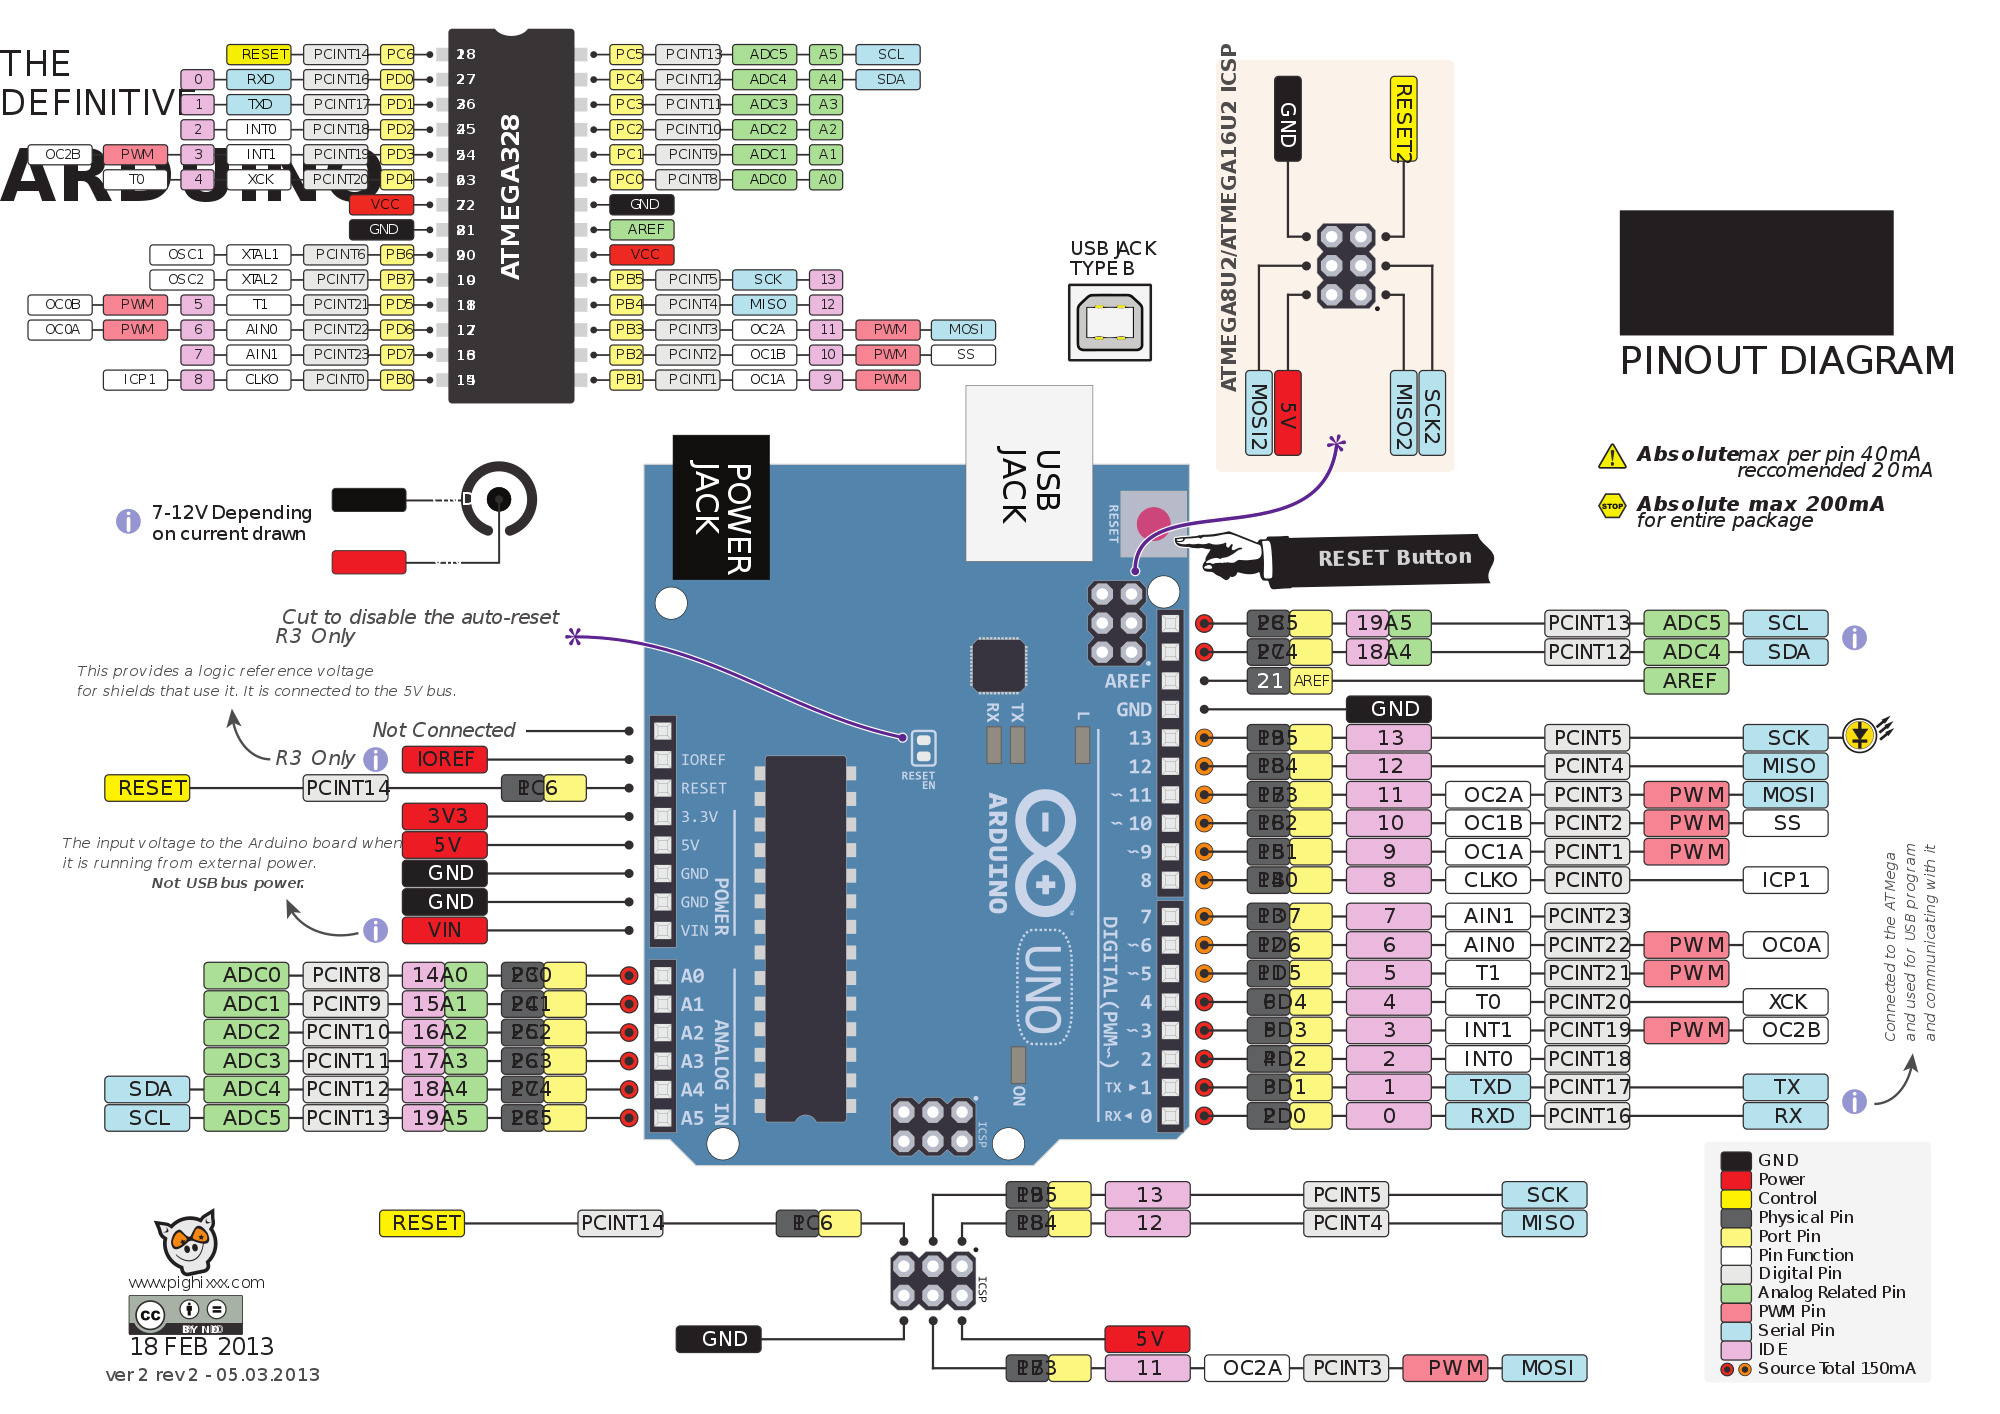
Pinout for ATmega 328p (as used in Arduino Uno): https://www.circuito.io/blog/arduino-uno-pinout/
What is “Arduino”?
1. A board (or family of boards)
From: https://learn.adafruit.com/ladyadas-learn-arduino-lesson-number-0?view=all

Yours might look different (e.g. SMD chip)
2. An IDE (desktop or web)

- Text editor
- Console and serial port monitor
- Bundled tools for compiling code and uploading it to the Arduino (avr-gcc)
- Bundled examples, board definitions etc.
3. A library for C/C++
You’re writing C code, and taking advantage of libraries written to make controlling an Arduino easier:
void loop() {                       // Defining a function in C
  digitalWrite(LED_BUILTIN, HIGH);  // Using Arduino library functions
  delay(2000);
  digitalWrite(LED_BUILTIN, LOW);
  delay(1000);
}
4. An open source community
- Designed for artists and other non-engineers. Newbie-friendly.
- Open Source (Eg Creality printer)
- Tutorials, answers online: Google first!
- Clone boards and compatible tech, e.g. add-on ‘shields’
- Variants - eg micro sew-on boards, DIY boards
- Pathways to other platforms: ESP8266, Arm, Bela, Pi, Processing
Getting started
Download, install and verify the Arduino IDE software for your computer: https://www.arduino.cc/en/Main/Software
If you want to use the web editor, you must create an account and install the plugin first: https://create.arduino.cc/projecthub/Arduino_Genuino/getting-started-with-arduino-web-editor-on-various-platforms-4b3e4a
Hacking code
- You don’t need to start from scratch!
- Everyone learns by hacking other people’s code – but credit your sources.
- Arduino comes with simple examples for many common tasks (File > Examples)
- There are libraries for many more (reading an SD card, playing MP3s, controlling stepper motors)
- There are code examples everywhere on the web
Example sketch: Blink
// the setup function runs once when you press reset or power the board
void setup() {
  // initialize digital pin LED_BUILTIN as an output.
  pinMode(LED_BUILTIN, OUTPUT);
}

// the loop function runs over and over again forever
void loop() {
  digitalWrite(LED_BUILTIN, HIGH);   // turn the LED on (HIGH is the voltage level)
  delay(1000);                       // wait for a second
  digitalWrite(LED_BUILTIN, LOW);    // turn the LED off by making the voltage LOW
  delay(1000);                       // wait for a second
}
Open the sketch
Examples > 01. Basics > Blink
Install drivers if you need to
(often for clone boards with a CP210x USB chip): https://learn.adafruit.com/ladyadas-learn-arduino-lesson-number-0?view=all#install-drivers-if-not-using-arduino-uno-16-9
Plug board into computer with USB cable
Select the Board and Port in Arduino IDE
Tools > Board > (for most of you, “Arduino/Genuino Uno”) Tools > Port > (varies by platform)
e.g.
- Mac:
/dev/cu.usbmodemxxxx - Windows:
Arduino UNO (COMxx)
Upload!
Sketch > Upload
Or right arrow on toolbar
It will often go wrong!
- Look at the messages in the console
- Check everything is connected
- Check you have the right board and port selected
- Try a different USB port, dongle or cable
Going further…
See https://learn.adafruit.com/ladyadas-learn-arduino-lesson-number-2
Power
- Via USB from computer
- Via USB from 5V wall adapter / phone charger
- Via 12V barrel jack
- Via LiPo battery, or portable USB battery pack
Connecting other things
Breadboards and jumper wires
 (From https://hcie.csail.mit.edu/classes/2018-fall-6810/6810-electronics.html)
Headers
See https://learn.adafruit.com/ladyadas-learn-arduino-lesson-number-0?view=all#header-sections-11-12
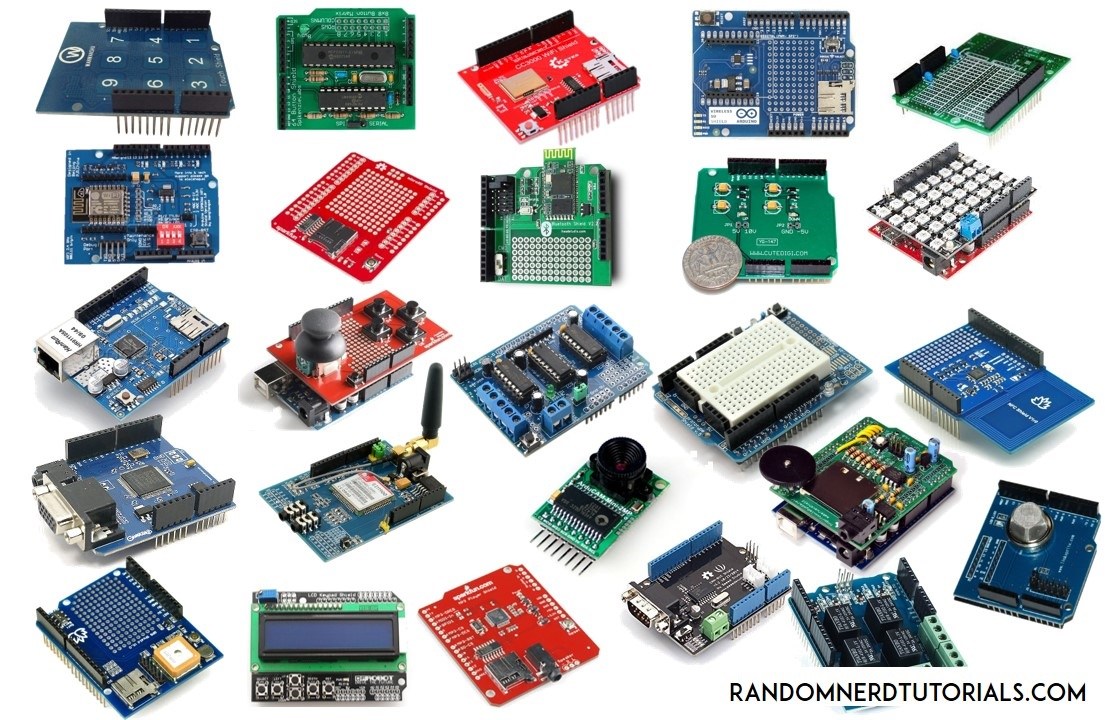
Shields
From https://randomnerdtutorials.com/25-arduino-shields/
Learn more
How Arduino is open-sourcing imagination – Massimo Banzi
Getting Acquainted with Arduino – good video series
Ladyada’s Learn Arduino - Lesson #0 – good tutorial series