Programming interactivity with the BBC Microbit
An introduction to making interactive devices
Prep for this week’s class
- Watch the Microbit intro videos: https://microbit.org/guide/quick/
- Read this introduction: https://learn.adafruit.com/bbc-micro-bit-lesson-number-0?view=all
- Familiarise yourself with the online programming environment: https://makecode.microbit.org
Baseline
We assume no prior knowledge of microcontrollers, the Microbit, or programming. However, you will find it much easier if you have looked at the materials in the Prep section, and played around with the online programming environment.
Teams
Our first session with Teams, so some principles:
Setup
Instructions on how to join Teams: https://mediastream.brighton.ac.uk/Play/28377
The Team code for this module is: hfde6an
A getting started guide is here: https://staff.brighton.ac.uk/is/computing/Pages/Teams.aspx
If you have any questions, please email me.
If you are having a technical issue, please post it in the chat, or contact the Service Desk on 01273 644444 / servicedesk@brighton.ac.uk
How we’ll use it
- Video meeting for full 3 hour session
- I’ll talk with video and share my screen
- Recording the session
- Exercises: I’l keep my video open, you can speak up or share questions in chat while you’re working on a project
- This afternoon: Kyle can support (also with previous assignments, esp CAD). Format TBC.
Etiquette
- Mute if you’re not talking
- If you have a question, please post it in the chat
- Use headphones if there is feedback
- Prepare in advance so we don’t waste the session dealing with technical teething problems
- Let me know if you can’t hear me or don’t understand – I can’t rely on visual clues
Plan for the session
- Lecture - 45 mins
- Exercises with help - 2 hours
- Kyle available this afternoon on this Team
Making interactive devices aka “Making things do stuff”
Spectrum of making (informal, exploratory, small <—> efficient, mass-produced, resolved):
- Learning
- Prototyping
- Small-scale batch manufacturing
- Large scale manufacturing
Different kinds of microcontroller used at each stage, but many of the principles are the same
- Microbit
- Arduino
- AVRs
- Commercial ICs
- Blob ICs
What is a microcontroller?
- Microcontroller vs Microprocessor
- Microprocessor is what’s inside your computer - needs lots of external parts to make it work: RAM, GPU, disk, etc.
- Microcontroller is a simpler computer
- Has lots of ‘peripherals’ inside - see block diagram
What’s inside a microcontroller?
Look at a datasheet, e.g. the Nordic nRF51822-QFAA-R on the Microbit

Capabilities:
- Tell time / keep time
- Remember data
- Read analogue signals from the outside world
- Talk to other microcontrollers
- Send and control power out to other devices
Microbit actually has several microcontrollers onboard:
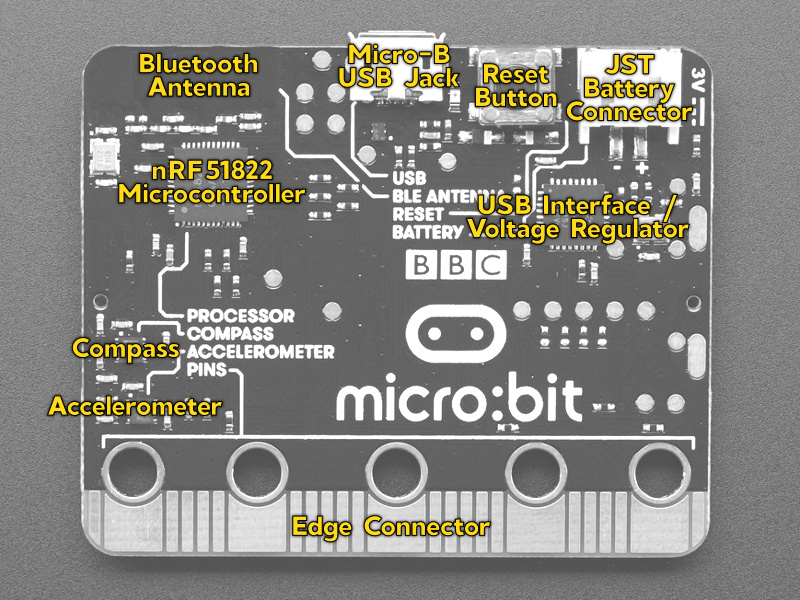
From https://learn.adafruit.com/bbc-micro-bit-lesson-number-0/take-a-tour
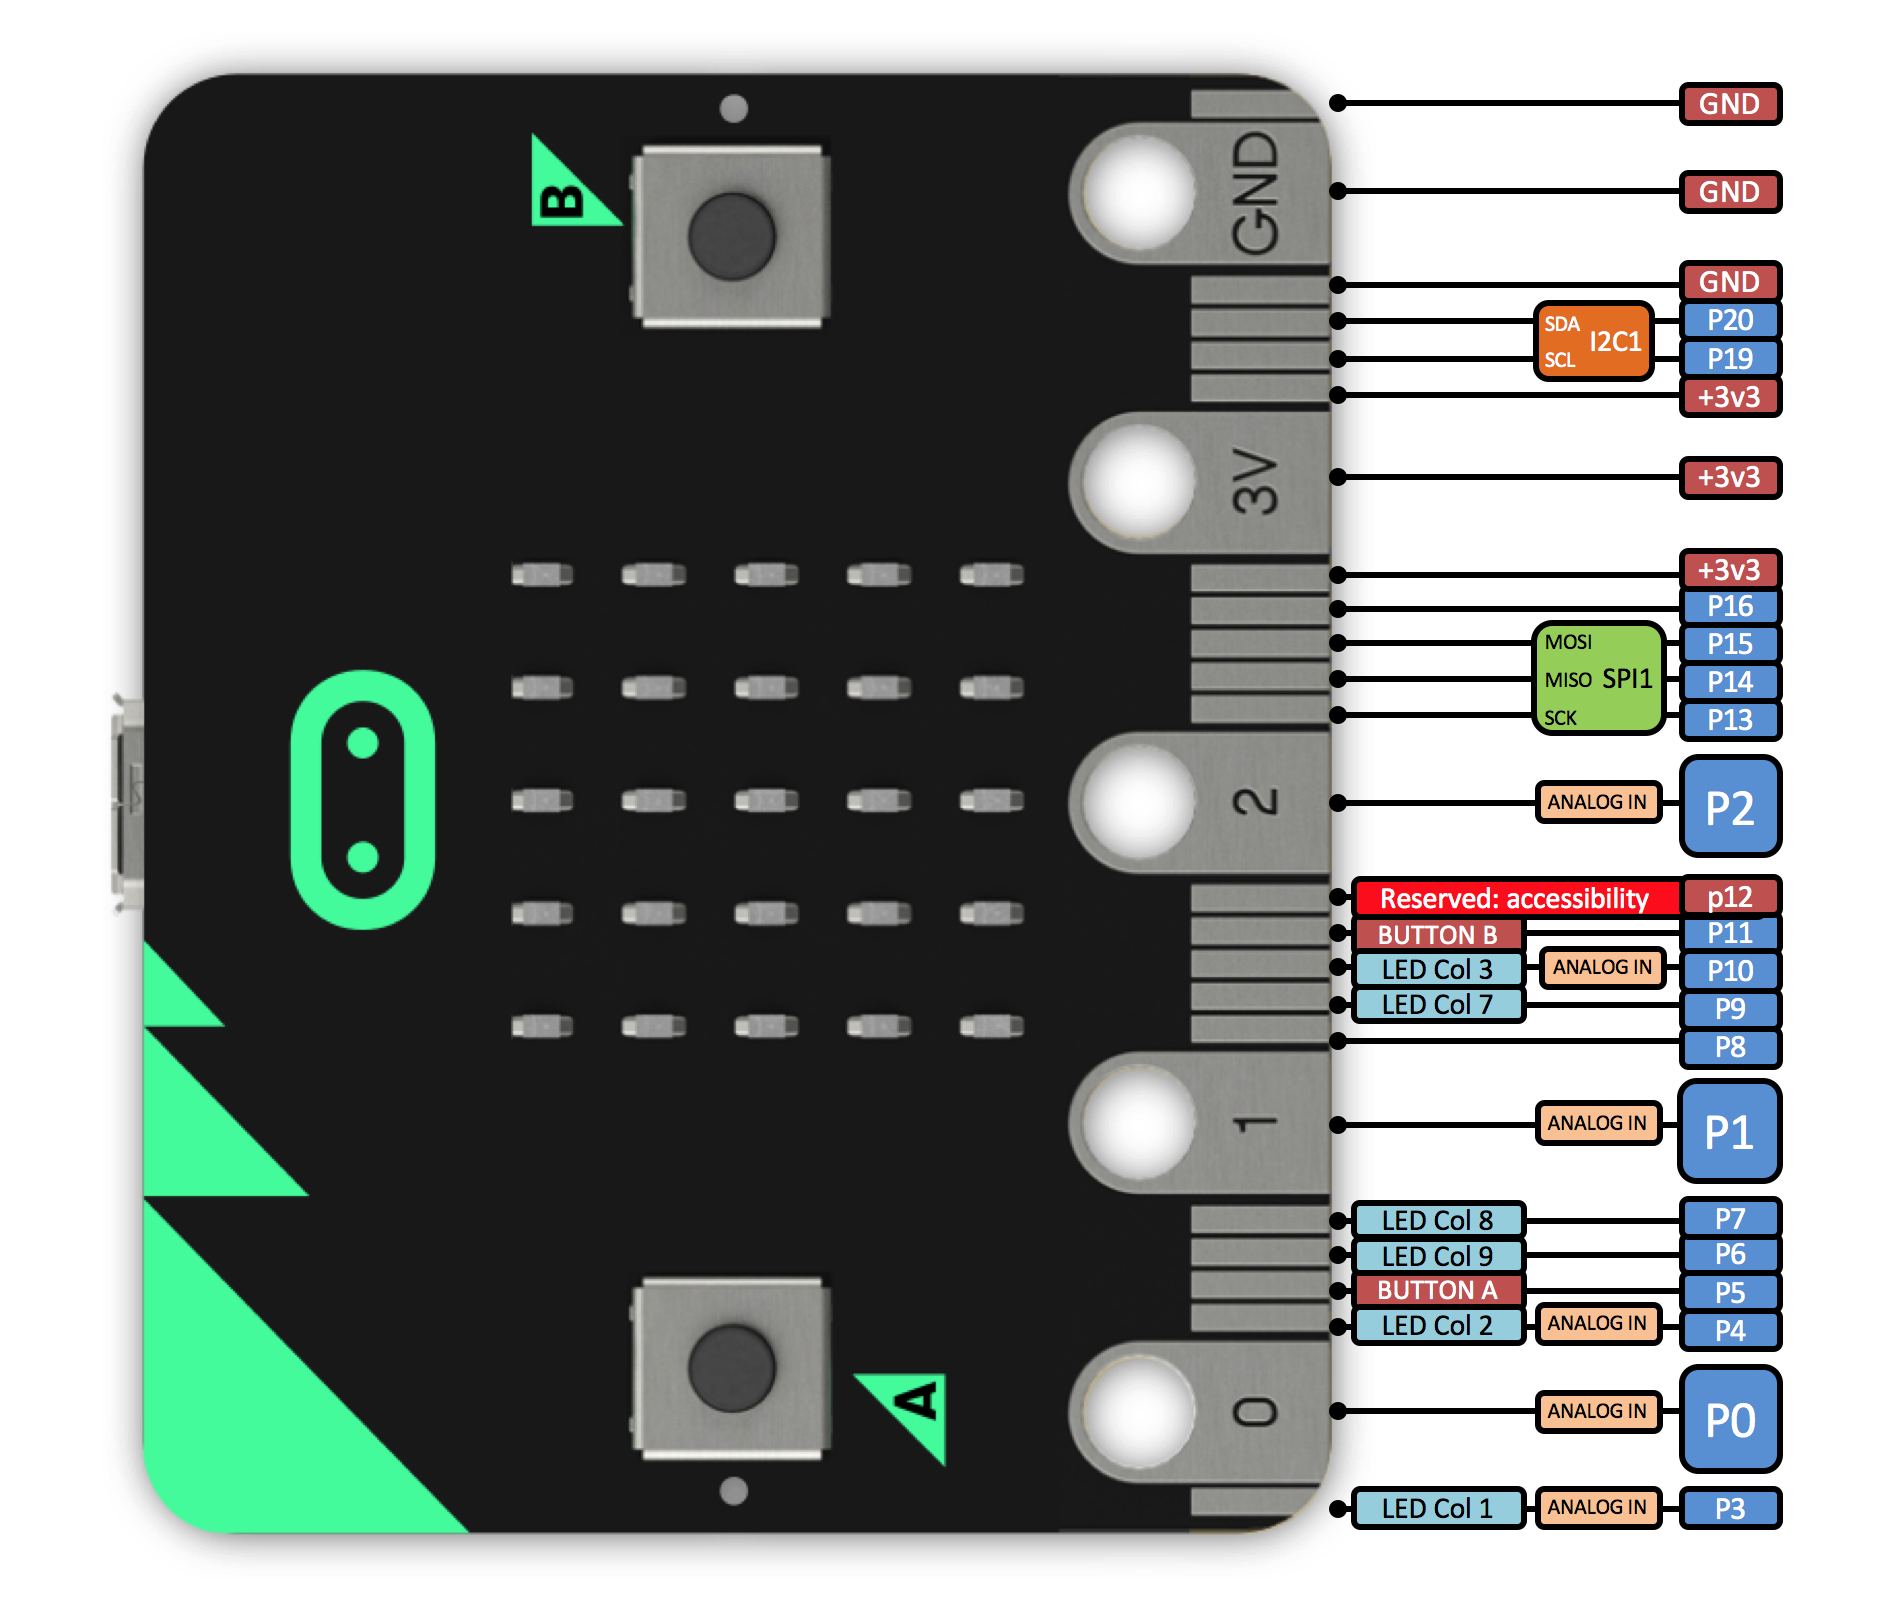
How can we access these capabilities? Through the Pins!
Pinouts are your friend. Here’s one for the Microbit:
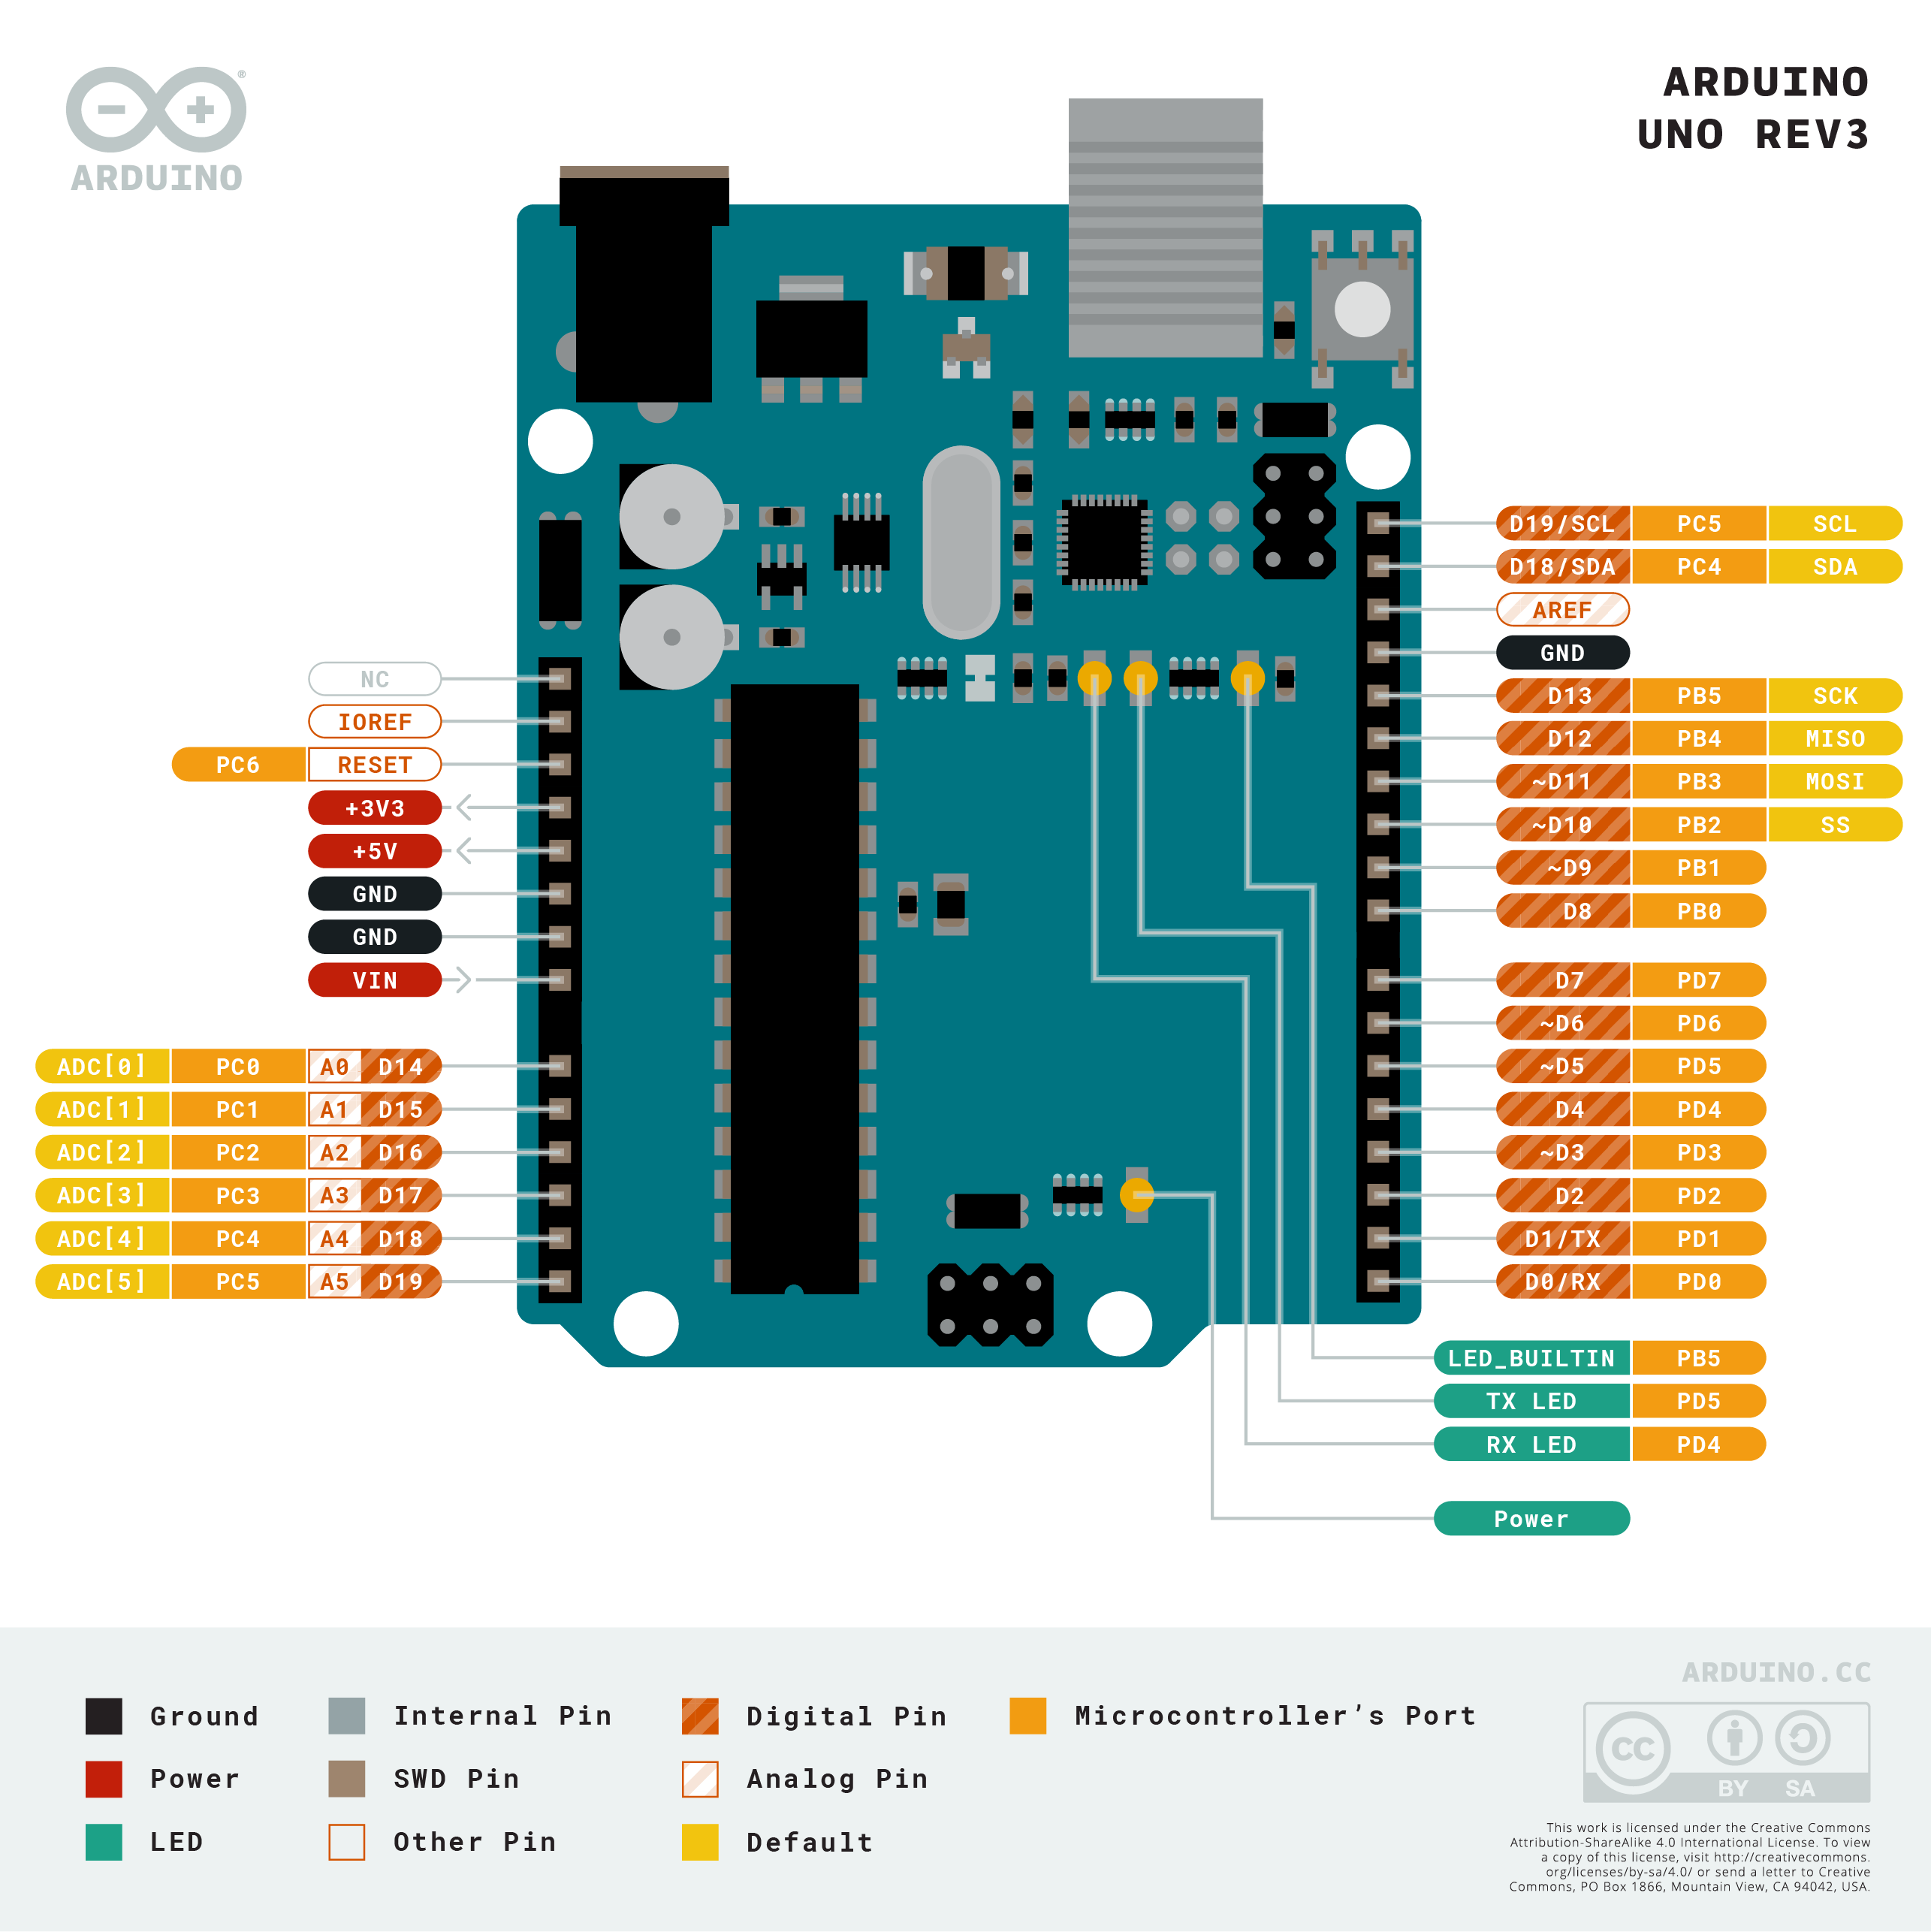
Or for the Arduino Uno (from https://store.arduino.cc/arduino-uno-rev3):
Writing programs for the Microbit aka “Embedded programming”
Online programming environment. https://python.microbit.org/v/2.0
Tour of the interface
Intro: https://learn.adafruit.com/bbc-micro-bit-lesson-number-0?view=all#lets-code
Getting a program onto the Microbit
What you’ll need
- Microbit
- USB cable (a good USB data cable - many are bad and won’t work)
- Computer running makecode website: https://makecode.microbit.org
Other options
- Use the phone app with Bluetoth connection (download Android or iOS app, pair yor phone with Microbit over BLuetooth (Microbit will need power))
- Use the simulator on the website
Process (using website)
- Create your program
- Download .hex file
- Connct Microbit to computer (appears as external disk)
- Copy .hex file onto Microbit ‘disk’ (overwriting previous program)
- Microbit restarts itself and runs program
Basic coding blocks
![]() Show interface.
Show interface.
Write code by assembling blocks. Instructions run in sequence, top to bottom, within the two main blocks:
on start – Runs once when your Microbit starts up.
forever – Runs contiously after on start for as long as your Microbit has power. Can run instructions thousands of times every second.
 Exercise: Make a name badge
Make your Microbit show your name when it powers up.
More core concepts
Variables (“remember this number so we can do something with it later”)

Put values into variables so you can use them elsewhere – e.g. in logic test, or loops:
set variable "temperature" = reading from temperature sensor on pin 4
if (temperature < 20) turn on heater
Logic (“if this happens, then do that”)

Debugging – what to do when it doesn’t work
Strategies:
- Simplify
- Save often
- Use the serial monitor (“tell me what happens at each step”)
- Step through your code - what is it really doing?
Gotchas:
- Is it plugged in?
- Did you actually upload the program?
- Are you testing for an impossible condition?
- Did the thing actually happen, just too fast to see?
Serial monitor

Useful for debugging, and to get data back to your computer, (e.g. if you’re logging data, or controlling an animation on-screen withan external controller)
Setting up a serial monitor: https://makecode.microbit.org/device/serial
- Mac: Terminal app
- Linux: screen app
- Windows: complex, see instructions jere: https://makecode.microbit.org/device/serial
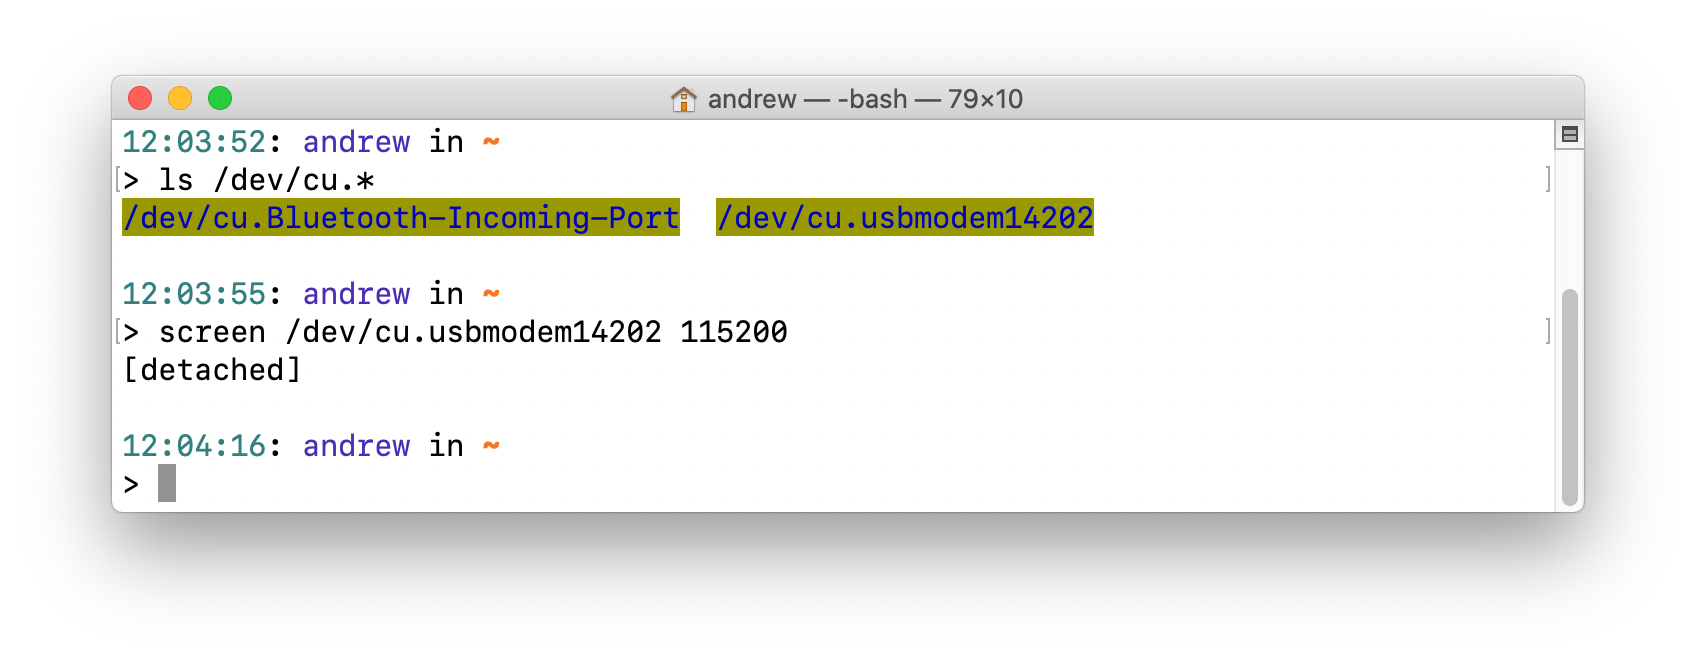
Instructions for Mac (commands to run in Terminal):
Find out the port your Microbit is on:
ls /dev/cu.*
Result, something like this:
/dev/cu.Bluetooth-Incoming-Port /dev/cu.usbmodem14202
Pick one that looks likely - not the Bluetooth port in this case.
Start a serial connection on that port, with a specified baud rate
screen /dev/cu.usbmodem14202 115200
To exit Ctrl-A then Ctrl-D
Exercise: Go further
- Make the LED matrix repond to the two buttons on the front of the Microbit
- Use some of the other onboard sensors: compass, accelerometer (shaking, orientation)
- Assemble some blocks to respond to more than one input
e.g.
- Driving game
- Reaction time game
- Earthquake alarm
Assignment
Write a program that use the built-in inouts and outputs ont eh MIcrobit Consider an interesting device you might be able to incorporate into one of your other projcts: clothing, jewellery, a musical device or art installation.
What do I need to do to pass? (40%)
Write a program using the code blocks editor that uses the buttons or sensors on the Microbit to display something on the LED display.
Experiment with the different sensors. What kinds of data can you get out of them? How are they imperfect? (How can they be misleading, or unreliable, and what can you do to about it?
Document all your work on your student blog, with photos and videos to show what you did, what went wrong, and how you fixed it.
Cite external sources where you have used someone else’s work.
Extra credit (50-100%)
Write several programs to demonstrate how the different sensors work.
Explore the different blocks available in the code editor. Describe what they do, and how you could use them.
Try to implement the same program using the MicroPython editor. What are the differences? Can you make the Microbit communicate with your computer - e.g. to send messages back. Can you include logic in the program to make it communicate in a more ‘human’ way?
Try to make a game that ues the buttons or sensors for input, where the player has to respond to images on the LED display (e.g. Simon Says, Tetris, a driving game).
Further reading / watching
- https://learn.adafruit.com/micro-bit-lesson-1-using-the-built-in-sensors
- https://learn.adafruit.com/micro-bit-lesson-2-controlling-leds-on-breadboard
- https://learn.adafruit.com/micro-bit-lesson-3-neopixels-with-micro-bit
- https://learn.adafruit.com/micro-bit-lesson-4-sensing-light-and-temperature
For next week
Do some research about basic electronics:
- How circuits work
- Inputs and Outputs