2D Fabrication: Laser cutter
Precise cutting of thin sheet materials
Prep for this week’s class
Bring some materials you’d like to try on the laser cutter (they must be checked for safety first, you must know what they’re made from, and should have a data sheet or be able to show a manufacturer or retailer webpage for that material).
Baseline
No knowledge of laser cutters or software assumed. However, you will find this session much easier if you have spent some time playing with vector graphics software:
- Install and try out some 2D vector software (handbook)
Main software we will be using:
-
Illustrator: Commerical, industry-standard in creative professions, nice to use, but not optimised for laser. Installed in labs and available with discount, £16-20/month
-
Inkscape: free and open source. A bit fiddly, but many useful extensions for machine control.
-
Fusion 360: Really 3D design softwae, but does have 2D sketching tools, and can export 2D artwork as DXF. Also has very useful parametric design tools (great for fine tuning artwork for the laser cutter). Free for students and hobbyists.
Other options:
- Affinity Designer (Commercial, £20-50, Windows, Mac and iPad)
- Bez for iPad (has a free version)
Safety
![]() Review the Standard Operating Procedure
Review the Standard Operating Procedure
Rules
- Don’t step away from the machine. Always supervise.
- Don’t put any materials in the machine that iy don’t know to be safe: Paper, card, acyrlic, MDF and laser-grade plywood shoul dbe OK. For other materials (including other plywood), check first.
- Always use the extractor when cutting
Fire
All laser cutters want to catch on fire
Card, MDF, plywood and acrylic are all really close to combusting when cutting.
- Initial combustion: press the pause button, or open the lid a crack to switch off the laser.
- Larger flame (more than a candle): turn off the extractor to stop airflow, smother the material or
- Last resort: use the fire extinguisher if trained.
Cutting card:
- Use single ply corrugated card
- Orient corrugations front to back
Fumes
The material has to go somewhere, …
- Exhaust - draws combustible material out. (Machine: Extractor)
- Assist - injects air at the cutting point. (Machine: Compressor)
If it’s not strong enough, that material stays around - Bad news
Exhaust fumes are very bad news
Plastic will outgas for a minute after cutting. Leave the lid closed for a minute. Leave the plastic in the machine if you can, or take it to a ventialated place.
Damaging the machine
Laser optics need to be kept clean, otherwise, heat can build up and break them (so avoid smoke).
You shouldn’t see smoke hanging around in laser cutting chamber. Always use the assist and extractor.
Never cut metal. Be very careful if using a solid sheet bed that you don’t overstep the edges of the material.
Laser cutting
![]() Before you use the laser cutter, you must have an induction and review the Standard Operating Procedure
Before you use the laser cutter, you must have an induction and review the Standard Operating Procedure
![]() Everyone should cut something this morning.
Everyone should cut something this morning.
What you can do
- Raster engraving
- Vector cutting
What you can control
- Speed
- Power
- Frequency
- Resolution (for engraving)
- Special artwork tricks: colour-coding, placement of lines, mixing vector and raster artwork
Lots of guidelines for experimentation: https://www.epiloglaser.co.uk/assets/downloads/manuals/legend-manual-web.pdf Take notes, expeiment and see what effect changing the settings has
Workflow
See Fab Academy docs here: https://docs.google.com/document/d/1kDd0A60eJdmJgIRt-zmAJwxszw0Gd61VXqHKnizv6hg/edit
Preparing artwork (for vector cutting)
- 2D vector file, in a dumb format (EPS or DXF)
- Make the format as simple as possible
- All shapes no fill, and 0.001mm stroke
- Laser origin is top left
Place material
- Consider airflow
- Alignment against the rulers
- Support to distance the material from the bed
- Flat surface - consistent z-height
- Masking tape for light materials or to protect surface
Set origins and focus
- Use laser pointer
- Set x and y origins
- Use focus tool to set z-origin
Settings
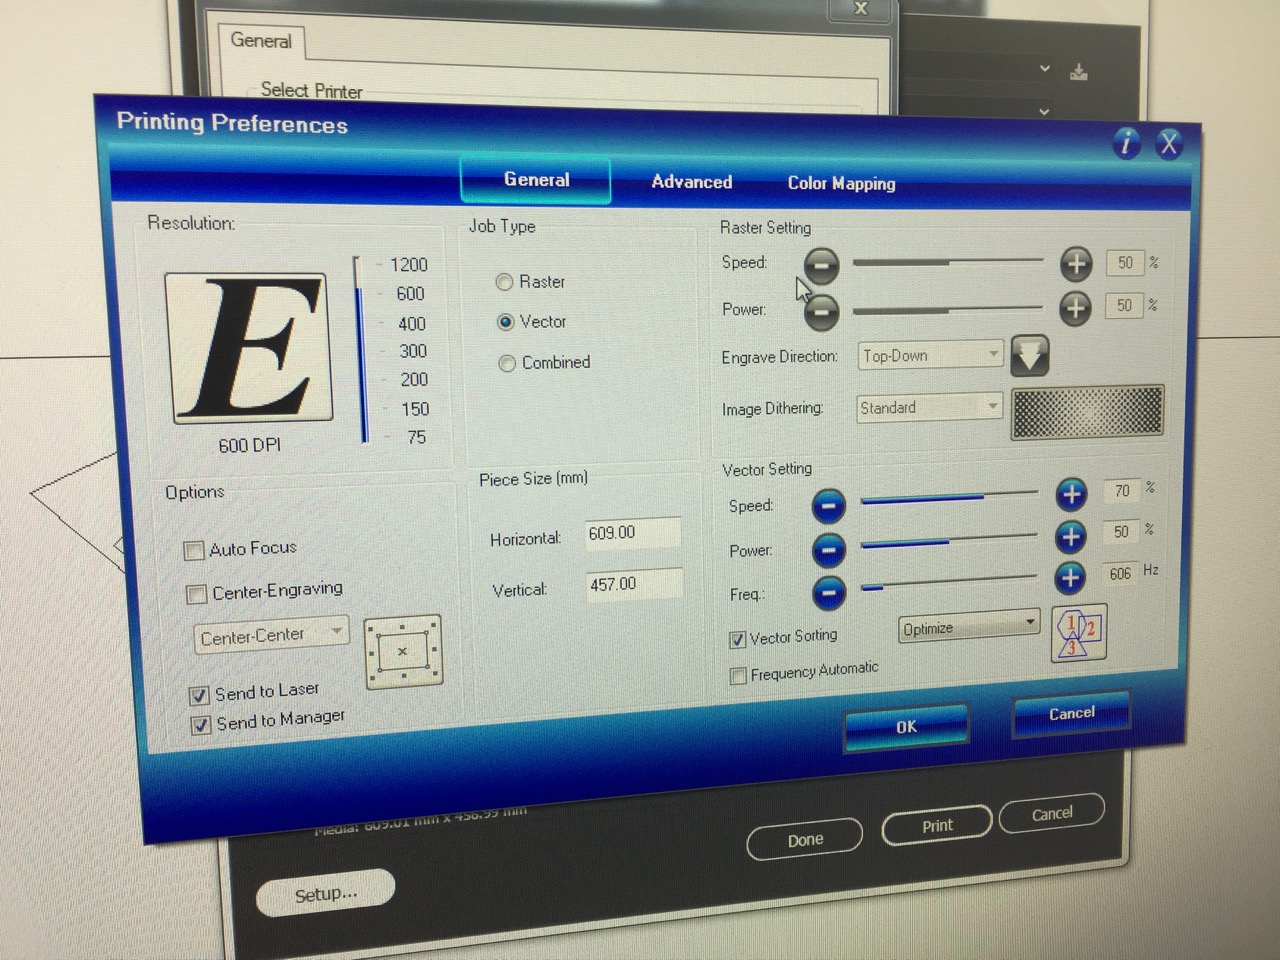
- Power - too much melts, too little doesn’t cut. Use multiple passes.
- Speed - too slow can cause combustion, too fast doesn’t cut
- Pulse rate/Frequency - too close can melt, too far apart can leave gaps
- Coordinate system, origin is top left
- Vector mode for cutting, raster mode for engraving (but interesting grey areas for experimentation)
Extraction
- Turn on the BOFA extractor (speed approx 330m3h)
- Turn on the air compressor
Whilst it’s cutting
- Always observe the cutting closely
After the cut
- Leave the lid closed with the extractor on for 30 seconds
- Clean the bed - If using the metal sheet, take it to the sink and carefully clean it without bending the sheet
Advanced laser cutter use
Materials
- Cardboard - the good stuff bows, not kinks. Use old boxes. Very forgiving for joints
- Plywood - Real thickness != real thickness - use the callipers.
- PMMA/acrylic/plexiglass/perspex/lucite glue bend
- POM/delrin/acetal - more elastic than acrylic
No-gos
- No PVC - releases chlorine
- Never put a material into the cutter unless you know where it came from - no random plastic.
- Never put anything shiny (e.g. metal) into a CO2 laser
Assignment
Cut a series of small sample pieces to measure effect of different settings:
- Effect of kerf on fit of assembled parts
- Engraving effects
- Scoring, folding
- Material damage, edge qualities
Check with me before using any material on the machine other than:
- Cardboard
- MDF / Plywood
- Acyrlic
Use small pieces of scrap wherever possible. Cardboard is the best material to test with.
Document all your work on your student blog, with photos and videos to show what you did, what went wrong, and how you fixed it. Cite external sources where you have used someone else’s work.
What do I need to do to pass? (40%)
Review the Standard Operating Procedure
Demonstrate safe use of the laser cutter.
- Make some samples of one or more cutting techniques using cardboard
- Photograph them
- Document how the settings have effected the end result
Extra credit (50-100%)
Try different materials Try engraving as well as cutting
For next week
We’ll continue with the laser, and learn some more about vector software.
Optional: try the vinyl cutter.
If you’re new to vector art software, spend some time trying some out on university computers, or your own machine if you can.
Watch some tutorial videos:
- https://www.linkedin.com/learning/illustrator-2020-essential-training
- https://www.linkedin.com/learning/laser-cutting-design-for-fabrication
Bring some materials you’d like to try on the laser cutter (they must be checked for safety first, you must know what they’re made from, and should have a data sheet or be able to show a manufacturer or retailer webpage for that material).